Bonsai Techniques
Transplanting
by Lew Buller
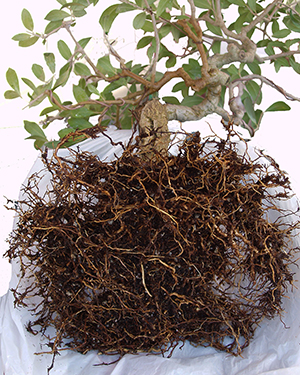
A Chinese Hackberry that I have been growing for about 15 years provides a good example of the need for transplanting regularly and at the best time of year.
In mid-June 2014, leaves began turning yellow and dropping. I tried more water, but that didn’t help. Then I tried pushing a chopstick into the soil and it wouldn’t go. Time to panic.
The tree clearly needed fresh soil and when I finally found the date tag, it showed 5 years and 4 months since it had been transplanted last.
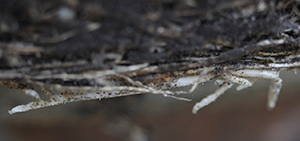
Late transplanting for 1 year would have been OK; San Diego generally has temperatures in the low 70s until July. 5 years not OK. When it came out of the pot, there was good news and bad news. The good: there were white roots showing it could be transplanted. The bad: so rootbound that I knew I had no choice except to do a substantial transplant. Three photos give you the picture, pun intended.
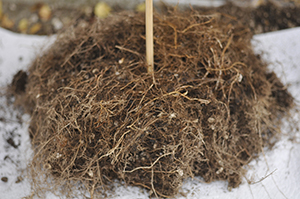
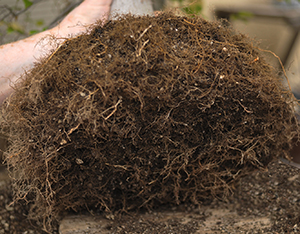
The pile of roots is about 9” wide and 4 ½” high. It represents about 3/4” of roots removed at the sides and the bottom.
Back it went into the pot with fresh soil added on the bottom and the sides. Then out for a thorough watering, followed 15 minutes later by another thorough watering to wash out any fines left in the soil. It will be in shade for a week and then back out into morning sun.
The less trauma the better. Sometimes it is sufficient to remove a half inch or so of soil from the top and replace it with fresh soil. That provides new nutrients and a free flow of water. If necessary, trench around the edge, removing enough old soil to allow fresh soil to be introduced.
Transplanting, in addition to providing fresh soil and fresh nutrients, is useful for developing a balanced root system, just as balancing the foliage develops the design. It is also necessary to go from a growing pot into a bonsai pot and the trimming will not be so traumatic if some balancing has been done with earlier transplants. Some would add another reason. Fix a badly formed set of roots early to find out quickly whether a tree is going to live or die rather than baby it for several years only to have it die when the necessary work is finally done.
After care is perhaps more important than knowing how many roots and how much canopy can be removed at transplanting. After care may include putting the tree in the shade (putting a tree with buds just beginning to burst in the early spring sun is usually OK,; putting a tree in full sun with developed leaves that demand more water may not be OK); also misting a tree to make sure it is supplied with water, and protecting it from drying winds are beneficial.
Learn to recognize healthy roots. The growing white tip is just as good an indicator of time to transplant as buds at bud break are. If the Hackberry had not had white tips, but rather had black tips, I would have given it an appropriate funeral. Healthy bougainvillea roots are white and thick, junipers are fine and black. Boxwood roots are tan and thicker than juniper roots. Roots and foliage mirror one another; if the top doesn’t look good, chances are the roots don’t either.
Bonsai teachers have been telling students to transplant at bud burst because this was the safest time; beginners would likely be successful in their transplanting then. It is OK to transplant during a much longer period of the tree’s life, knowing it will be successful if aftercare is proper. Pages 117-120 of Naka’s Bonsai Techniques I show his “Chart for Transplanting and Changing Soil;” many of the trees listed there can be transplanted during 3 or even 4 or more months, not just at bud burst. Transplanting can be:
Early–before bud burst; also before dormancy
Best time–safest–at bud burst
Late–at end of transplanting season
During dormancy–Little or no growth taking place
Like everything else in this series, transplanting must be adjusted for your climate. Early transplanting in fall should not begin until fall weather has settled down.
In late transplanting, be slightly less aggressive in cutting roots, keeping more fine roots, but usually still removing large roots that would prevent the plant from being potted properly in a bonsai pot. The soil mix may be different for a tree transplanted late. If a tree has been in the ground or in a pot for a long time, the replacement soil may be much closer in texture to the old soil than otherwise. At the next transplanting during the best season for the tree, the soil may be removed and replaced with the most desirable soil mix for the tree. The purpose of the careful soil match is to change the environment of the roots as little as possible when transplanting out of season.
Root pruning when transplanting during dormancy can be normal. The real risk is in aftercare. Be especially careful not to over water a tree that has just been transplanted. The roots must first grow new root hairs and root tips to be able to take up water. It is easy to over water and kill the tree.
What do I dislike most about transplanting? Getting my hands dirty. With only one or two trees, it’s OK. But if you spend the whole day working on your collection, several days in the spring, hands become dry and cracked and the time spent cleaning fingernails becomes excessive. The answer? Latex gloves. I’m probably the only bonsai enthusiast who carries talcum powder in his tool box. What’s the next worst thing? Incurved pots, or pots with an inner lip. It’s not possible to lift trees out of these pots, they have to be cut out or enough soil dug out around the edges to free up the sides of the plants.
What’s the most difficult part about transplanting?
Aside from the judgment of which one and how many roots to remove, it is the process of placing the tree in the pot and wiring it in. One pompous woman announced that she never wires her tree in the pot; she just packs enough soil in to hold the tree in place. My answer to her is “If trees don’t need to be wired in, why do they put wire holes in pots?” More correctly, the wires hold the tree firmly in place until new roots are developed and grow into the soil.
There may be none, two, three, or four wire holes in a pot. Four wires need to come up from the bottom of the pot, with a fifth short piece to connect them. With two- and three-holers, two of the wires coming up will need to share a wire hole. A pot with only two holes is no problem. Run two long wires through the holes, with the ends long enough to serve as tie down wires. In a three-holer, the wires share a hole only at one end.
It is not necessary to use heavy wire; it needs to be just large enough that it can be twisted and tied together without breaking. The wire in the three-holer is 16 gauge; in the cascade pot, 18 gauge. Wire is sold by the pound; the smaller the wire you can safely use, the less you have to spend on wire.
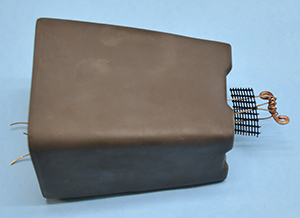
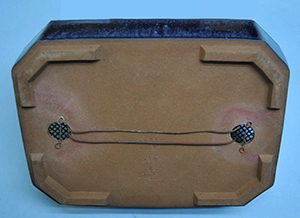
If there is only a drainage hole, it can be used for wiring. Even with no wire holes in the pot you still want to wire the tree in. This may be the case with small trees and small pots. This 5” tall cascade pot was used for a small cascading juniper. Do I wire such small trees in the pot? Yes, especially a cascade. Even though I might put a prop under the trunk as it goes over the edge of the pot, if I do not wire the opposite side of the plant down, the tree will tip down when the prop is removed.
First, create a crosspiece that is longer than the hole is wide. Then cut 2 pieces of wire, each twice as long as is necessary to go from the bottom of the pot to several inches above the top of the pot. Fold the wires in two, then take one and make 3-4 turns around the crosspiece, Use the second wire the same way except wrap it in the opposite direction around the crosspiece. The soil screen is shown outside the pot here, but it should be on the inside with the 4 wires coming up through it. Pull the crosspiece up tight, bend each wire out to the edge of the pot, add soil and proceed to add your plant and soil to cover its roots.
After the wires have been prepared and bent out of the way (do this first before adding soil) put a layer of soil on the bottom of the pot. It can either be a layer of coarse material (my preference) or a layer of the same soil that will be used to surround the tree. For larger trees, heap an extra scoop of soil over the spot where you plan to center your tree. When you put the tree in the pot, hold both sides of the root ball and work it back and forth to distribute the extra soil under the tree and fill any pockets in the root ball. I call this “Screwing the tree into the pot.”
With an upright tree, put it slightly back of center and tilt the tree forward. The extra depth at the front makes the pot look bigger–there is no need for a lot of space at the back as trees are not developed to be seen in the round–and tilting it forward gives the same perspective you would have looking up at a tall tree in a forest. The top appears to lean forward. To help you remember, think of the saying “A tree bows to its master.”
Trees with other attitudes need to be placed differently. A slant style will be planted off center to the side away from the slant, to balance the tree in the pot. Oval pots allow a slant style to be shifted further off center and provide additional space under the slant. A cascade should be close to the edge of the pot with the trunk just slightly above the rim of the pot. I use a cork to hold the cascade up from the edge of the pot. Special cascade pots help.

When you are satisfied with the placement of the tree, carefully tilt the tree to see if the soil is lower on one side or the other. If there is a low side, put soil there first while holding it level and work it under the root ball using a chopstick. Fill the pot about half way with soil, work the soil down with a chopstick (wiggle it in circles; don’t poke the soil down) put a bit more soil in, and work it down. Before you add the last soil, fasten the wires together, first pulling each wire up tight and straight through the soil. Make a loop in the short piece of wire and slide it down over one of the wires coming up. Then pull the upcoming wire taut, bring it over to the next wire, lower it as far as you can, and twist the two ends together. This way, the wires won’t show when the pot is filled with soil. Get in the habit of always taking the wire in the same direction and you won’t have to think about it. I wire counter clockwise. The loop over the first wire attaches to the fourth wire coming up from the bottom.
After the tree is wired in place, put more soil in, work it down, and continue until the soil is about 1/4 inch from the top of the pot. If you fill the pot to the brim with soil, water will run of the sides rather than sinking down into the soil.
Trees transplanted to growing pots may need to be wired in, but this can be done without bringing wires up through the bottom of the pot. Instead, wires are attached to the rim of the growing pot. This permits very careful positioning of the trunk before soil is added at the sides and an attachment point high on the trunk instead of low on the roots, giving greater leverage.